
The usual document structure
Taking a look at the OpenAPI specification file, there are several distinct sections:
- Information – which usually includes the title, version, some description, terms of service, etc.
- Servers – where we describe the servers that we use, usually split into production, staging, etc.
- Paths – resources that our API exposes and HTTP methods with which we manipulate the resources
- Components – collection of definitions that are being reused in the document, a section that allows us to avoid code duplication
In this post, we will be working with the following, rather simple, openapi.yaml file:
openapi: 3.0.3

info:
  title: An example API
  version: 1.0.0

servers:
  - url: https://localhost:8080/api/v1
    description: Local server

tags:
  - name: notifications
    x-displayName: Notifications

paths:
  /notifications:
    get:
      tags:
        - notifications
      summary: Gets latest notification
      operationId: getLatestNotification
      responses:
        '200':
          description: Latest notification
          content:
            application/json:
              schema:
                $ref: '#/components/schemas/Notification'
              examples:
                instagram-notification:
                  $ref: '#/components/examples/instagram'
                gmail-notification:
                  $ref: '#/components/examples/gmail'

components:
  schemas:
    Notification:
      type: object
      properties:
        text:
          type: string
        source:
          $ref: '#/components/schemas/Application'
        timestamp:
          $ref: '#/components/schemas/Timestamp'
    Application:
      type: object
      properties:
        name:
          type: string
        version:
          $ref: '#/components/schemas/Version'
    Timestamp:
      type: string
      format: date-time
      example: '2020-06-29T10:26:10.634Z'
    Version:
      type: string
      pattern: ^(\d+\.)?(\d+\.)?(\*|\d+)$
  examples:
    instagram:
      value:
        text: Somebody liked your photo!
        source:
          name: Instagram
          version: 147.0.42
        timestamp: '2020-06-29T10:26:10.634Z'
      summary: Example Instagram notification
    gmail:
      value:
        text: Your boss just sent you a mail!
        source:
          name: Gmail
          version: 2020.05.31
        timestamp: '2020-06-29T10:26:10.634Z'
      summary: Example Gmail notification
Splitting the specification
Naturally, during the development of the application, the API and it’s specification will undergo changes. Change by change, the document can grow and achieve a size that makes it hard to work with. To deal with this issue, it is smart to split up the specification into multiple files. Important thing to keep in mind when splitting it into multiple files is to not get carried away, so we should lean towards keeping things reasonable – files shouldn’t be too small nor should they be too big. One of the common ways to split the specification is to have a main file which consists of info, servers and tags, and have separate files for models and examples.
After splitting our example file we should have three files:
- openapi.yaml :
openapi: 3.0.3

info:
  title: An example API
  version: 1.0.0

servers:
  - url: https://localhost:8080/api/v1
    description: Local server

tags:
  - name: notifications
    x-displayName: Notifications

paths:
  /notifications:
    get:
      tags:
        - notifications
      summary: Gets latest notification
      operationId: getLatestNotification
      responses:
        '200':
          description: Latest notification
          content:
            application/json:
              schema:
                $ref: 'models.yaml#/components/schemas/Notification'
              examples:
                instagram-notification:
                  $ref: 'examples.yaml#/components/examples/instagram'
                gmail-notification:
$ref: 'examples.yaml#/components/examples/gmail'- models.yaml :
components:
  schemas:
    Notification:
      type: object
      properties:
        text:
          type: string
        source:
          $ref: '#/components/schemas/Application'
        timestamp:
          $ref: '#/components/schemas/Timestamp'
    Application:
      type: object
      properties:
        name:
          type: string
        version:
          $ref: '#/components/schemas/Version'
    Timestamp:
      type: string
      format: date-time
      example: '2020-06-29T10:26:10.634Z'
    Version:
      type: string
      pattern: ^(\d+\.)?(\d+\.)?(\*|\d+)$
- examples.yaml :
components:
  examples:
    instagram:
      value:
        text: Somebody liked your photo!
        source:
          name: Instagram
          version: 147.0.42
        timestamp: '2020-06-29T10:26:10.634Z'
      summary: Example Instagram notification
    gmail:
      value:
        text: Your boss just sent you a mail!
        source:
          name: Gmail
          version: 2020.05.31
        timestamp: '2020-06-29T10:26:10.634Z'
      summary: Example Gmail notification
Notice that we changed the references in openapi.yaml to schemas and examples, so from ‘#/components/schemas/Notification’ we changed to ‘models.yaml#/components/schemas/Notification’
We could have gone more into depth and split the specification by tags or parts of the specification itself, so the structure could look like this:
├── notifications
│   ├── examples.yaml
│   ├── index.yaml
│   └── models.yaml
└── openapi.yaml
The document structure is totally up to you and is dependent on the use case you are faced with, either one works.
Generating the documentation
To generate a HTML page that will serve as the documentation, we need the redoc-cli. We can install it by running npm i redoc-cli.
Other than installing the redoc-cli, we are also going to need a template for the documentation. The template we will be using looks like this:
<!DOCTYPE html>
<html>
  <head>
    <title>ReDoc</title>
    <!-- needed for adaptive design -->
    <meta charset="utf-8"/>
    <meta name="viewport" content="width=device-width, initial-scale=1">
    <link href="https://fonts.googleapis.com/css?family=Montserrat:300,400,700|Roboto:300,400,700" rel="stylesheet">

    <!--
    ReDoc doesn't change outer page styles
    -->
    <style>
      body {
        margin: 0;
        padding: 0;
      }
    </style>
    {{{redocHead}}}
    {{#unless disableGoogleFont}}<link href="https://fonts.googleapis.com/css?family=Montserrat:300,400,700|Roboto:300,400,700" rel="stylesheet">{{/unless}}
  </head>
  <body>
    {{{redocHTML}}}
  </body>
</html>
<!DOCTYPE html>
<html>
After the redoc-cli has been installed and we have added the template, we can then run the following command to actually generate the documentation page npx redoc-cli bundle openapi.yaml -t template.hbs -o doc.html.
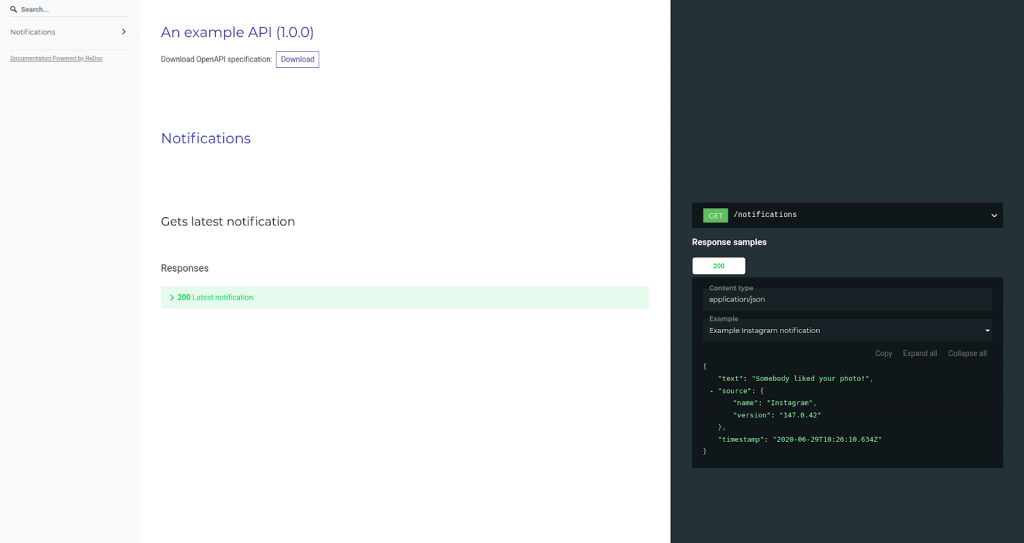
As a result, instead of providing our API consumers with the default swagger page, we got a neatly formatted page that we can further style:
Merging the files together
If it is required from you to deliver only one OpenAPI file, do not worry. You can still use the same approach with splitting the specification into multiple files and then merging them all together. To actually merge the files into one, we will be using the swagger-cli. After installing it with npm install swagger-cli, we can run the following command to merge the files into one npx swagger-cli bundle openapi.yaml --outfile build/openapi.yaml --type yaml
The merged file can now be found under build/openapi.yaml.