Why?
GAE(Google App Engine) is a great choice for developers who want to build and deploy applications in a minute. Thanks to a fully managed serverless platform, you are free from the painful server configuration for deployment as well as automatic scaling. But there is a problem that comes with the cost. Google App Engine doesn’t have a static IP because the service dynamically generates VM instances with temporary IP addresses.
Then, why do we need a static IP address for App Engine? Here are two use cases.
- The client application wants to call the server API via static IP address.
- The server calls security-critical third party API to complete its service, which requires a certain IP address whitelisted.
In the first case, an inbound static IP address should be assigned to the server, while an outbound static IP address is necessary for the second case.
Let us solve one by one.
Assigning inbound static IP address for App Engine
Please install Google Cloud SDK before starting this part. Most of the commands in this part are supported only in the beta release of Google Cloud SDK, thus not available in Google Cloud Console yet.
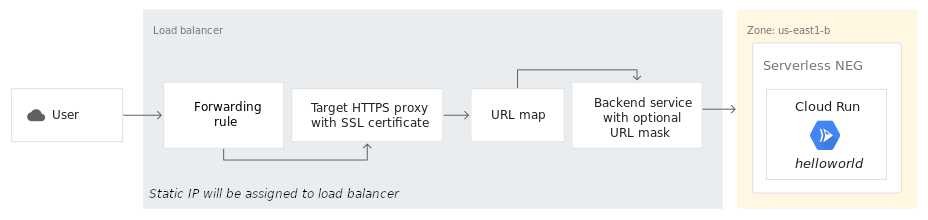
In order to assign a static inbound IP address to GAE, we are gonna use a load balancer with the static IP address.
The load balancer will accept incoming requests, then redirect it to serverless NEG(Network Endpoint Group).
Let’s create a serverless NEG first.
gcloud beta compute network-endpoint-groups create helloworld-serverless-neg \
–region=us-central1 \
–network-endpoint-type=SERVERLESS \
–app-engine-app
–app-engine-service=default
Here, region should be same as the one of GAE.
app-engine-service can be omitted if you are creating serverless NEG for default service.
Next step is to create a backend service and add the serverless NEG as a backend.
gcloud compute backend-services create helloworld-backend-service –global
gcloud beta compute backend-services add-backend helloworld-backend-service \
–global \
–network-endpoint-group=helloworld-serverless-neg \
–network-endpoint-group-region=us-central1
From commands above, network-endpoint-group-region is the region where serverless NEG was created.
Now, it’s time to configure the load balancer with static IP as a frontend and serverless NEG as a backend.
- Go to Networking/Network Services/Load Balancing.
- Click on “Create a load balancer”, choose HTTP Load Balancing and then start the configuration.
- On the next screen, it asks connection resource of the load balancer. We are going to accept incoming connections from the internet, thus select “From Internet to my VMs”.
- In backend configuration, please select the backend service we just created. It’s “helloworld-backend-service” in our case.
- Host and path rules are necessary if you are going to define redirect rules from hosts and paths to services. We only have one service available for the static IP address at the moment, thus skip it.
- In frontend configuration, select HTTP/HTTPS protocol, a static IP, and port. You can select a static IP already reserved, or create a new one if you haven’t done it yet.
Please select the standard type from the network service tier group, and the same region as one of GAE, otherwise, it won’t work! - Click on create to finalize creation.
Once all is done, you can check the configuration by typing the IP address on the browser.
Assigning outbound static IP address
Unfortunately, the former section didn’t change the outgoing IP address. The API request still keeps dynamic IP address of VM instance, which was dynamically generated.
The sad thing is, there is no way recommended by Google Cloud to solve this problem.
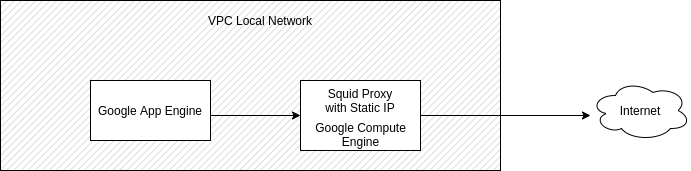
One solution is to assign a static IP address to Google Compute Engine instance and use it as a proxy. Please see the following diagram.
Let’s setup a VPC network.
- Go to Networking/VPC network/VPC networks and create a VPC network with the name “hello-world-vpc”.
- Add a subnet under “hello-world-vpc”, with the name “app-engine-network” and the same region as the one of GAE.
The next step is to configure the application so that GAE instances are deployed inside the VPC subnet.
Open app.yaml file in your source code and add the following network option.
network:
name: hello-world-vpc
subnetwork_name: app-engine-network
Then, redeploy the application to GAE.
Now, set up Google Compute Engine instance and a proxy server on it
- Go to Compute/Compute Engine/VM instances.
- Click on Create Instance.
- Select the cheapest type as an instance type, maybe f1-micro, since our server only work as a proxy.
- Configure network properties of the instance. Select the VPC network we just created, assign custom internal IP as well as external IP. We need fixed IP addresses for both internal and external.
- Click on create.
- After the instance is up, ssh into the instance and run the following commands.
$ sudo apt install squid3
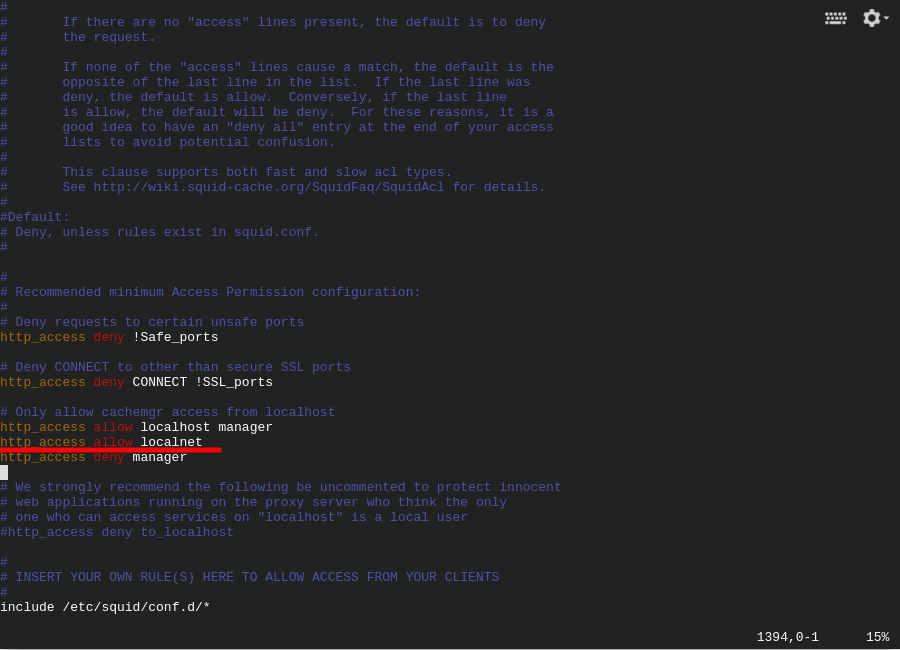
- Open and edit squid proxy configuration file, so that it can accept requests from localnet.
sudo vi /etc/squid/squid.conf
Finally, add a firewall rule to your VPC network
Squid proxy should accept HTTP requests from internal instances. For incoming requests, squid proxy opens 3128 port, but communication to the port is blocked by the firewall if unset.

Great! We are all set, we assigned the static IP address for App Engine
We can call third APIs through our proxy, and third party servers will see the static IP assigned to our proxy.
There is one disadvantage in this solution. That is, the proxy server can be a bottleneck for scaling applications. So, please use the proxy server only where it should be.
Hope this post helps your journey with GAE!